It is falsely believed that WordPress CMS is not suitable for online stores. Around 30% of global eCommerce store owners are using WordPress CMS. This is possible with the help of WooCommerce: the world’s most popular WordPress eCommerce platform. A detailed guide will help you understand how this platform works and will help you create your first online eCommerce store.
Table of contents:
1. Why should you choose WooCommerce?
2. First steps: choosing a hosting, installing CMS, choosing a design template
3. How to install and configure WooCommerce?
4. How to add products to the store on the WooCommerce platform?
5. How to set up your home page and menu items?
6. How to get used to with advanced WooCommerce settings?
7. How to set up taxes in WooCommerce?
8. How to configure delivery options?
9. How to set up payments for a store on WooCommerce?
11. How to perfectly optimize your eCommerce store on WooCommerce?
12. How to configure micro-layout and Open Graph protocol?
13. How to create an AMP for a store on WooCommerce?
14. Use the advanced features of WooCommerce.
15. WordPress and WooCommerce are AWESOME!
Why choose WooCommerce?
WooCommerce is a free WordPress plugin. It extends the functionality of WordPress websites and helps turns them into full-fledged online eCommerce stores. WooCommerce helps enhance the key features of WordPress. You can work with the plug-in for eCommerce without the knowledge and experience in web development.
As of today, the number of active plug-in installations exceeds 376,811. According to the analytic platform BuiltWith, WooCommerce is the most popular online trading platform in the world, the second position goes to Shopify.
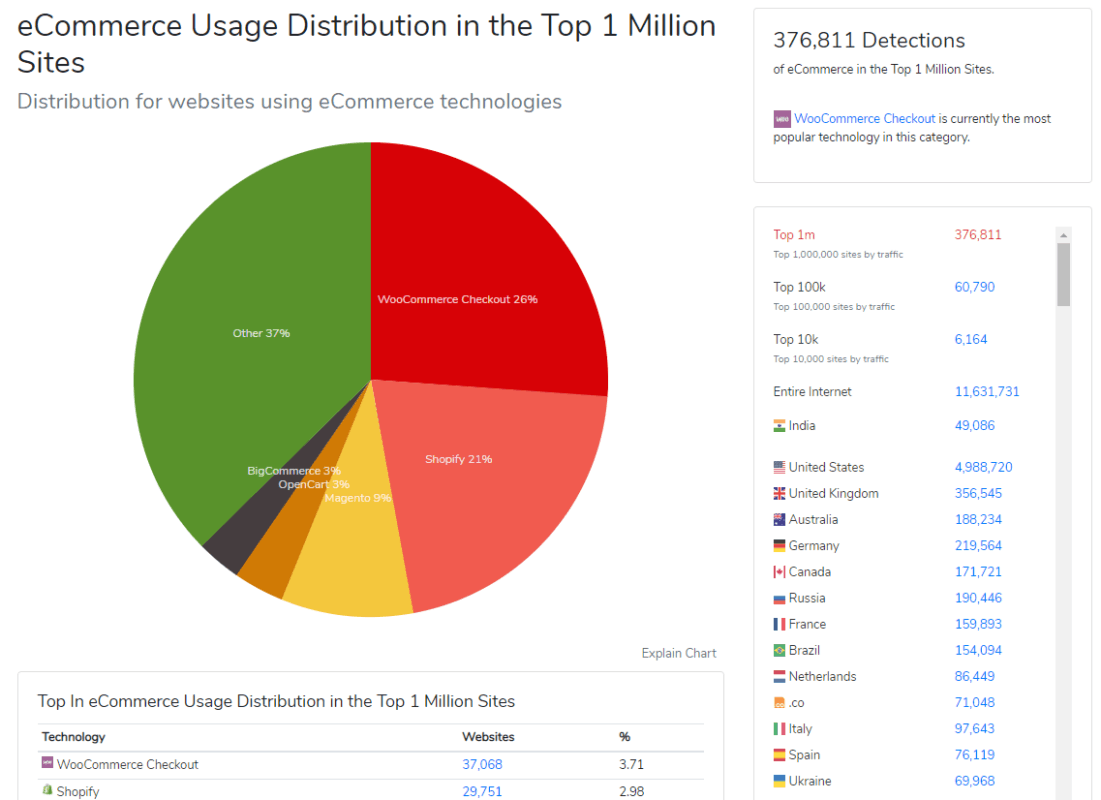
Considering all existing online stores, the share of WooCommerce exceeds 26%. If you try to go deeper from 1 million to 10 thousand of the most popular eCommerce platforms, you can see a substantial decrease in its popularity. And among the 10K popular stores, this percentage is reduced to 1.08%.

What are these statistics talking about? WooCommerce still remains out of the competition when selecting a user-friendly platform for all small and medium-sized stores. Large online merchants also use this platform, but many others use alternative solutions.
Is it worth it or not to use WooCommerce to create an online store? Here are the benefits of the tool:
- By the simplicity of settings and management, WordPress and WooCommerce are second to none. To create a store you do not need developer skills. Joomla !, OpenCart and Drupal are more difficult to work with, although these CMS can also be dealt with/without special knowledge.
- Reliability and reliability. WordPress sites work like clocks work. With other platforms, sometimes you have to get deeper into something to work. For example, integration of a micro-distribution module on Joomla! It might take up to 48 hours to get it done, but with WordPress, this task is solved in 5 minutes.
- Free tool regardless of revenue, the number of goods and other characteristics are unlimited. Many alternative solutions, such as the Ecwid module or Magento Enterprise Edition needs additional payments for advanced integrations.
- Developed infrastructure. WordPress includes thousands of free plugins and those that solve specific practical problems. When you work with other CMS, you will have to pay or might have to get in touch with the developers individually, thus paying more bucks from your pocket.
- Wide functionality. WooCommerce provides access to the basic features that an online store needs. And with the help of free and paid plug-ins, the platform’s functionality can be expanded, and the site adapted to the needs of a particular project.
WooCommerce has flaws. All CMS and eCommerce modules have the same drawback. And its the designers of those online stores, for example, Shopify, are deprived of it. If you do not want to deal with technical issues or the intricacies of customization, the task can be delegated to specialized specialists.
A store created using standard tools on WooCommerce looks stereotyped. You will have to invest time or financial resources in customization. All the sites that run on commercial CMS or open-source engines have the same drawbacks. The problem is solved by self-made platforms, but this is a very dangerous choice.
WooCommerce only works with WordPress. This may be a disadvantage for online merchants who prefer other CMS.
Advantages and disadvantages are easiest to evaluate in practice. If it’s not enough, you can look at examples of online stores that run on WooCommerce. If you are satisfied with the appearance and functionality of the stores displayed, you simply get started. We create websites that are optimized for search engines and bring sales. Contact! More details
First steps: Choosing a Good Hosting, installing CMS, Choosing the right Design Template
If you are creating an online store from scratch, choose a shared hosting in the beginning. You will not be able to reach a point where a dedicated server is required right away.
Pay attention to the amount of available disk space. If several dozens of products are on the display, the question is not critical. But if this number goes to hundreds or thousands, choose a hosting plan with a large amount of disk space is a must. 10 GB in the first stage is enough with a margin.
To work with a bunch of WordPress and WooCommerce, it is better to choose Linux hosting. It must support MySQL and PHP. The tariff plan should include access to the server control panel and to FTP.
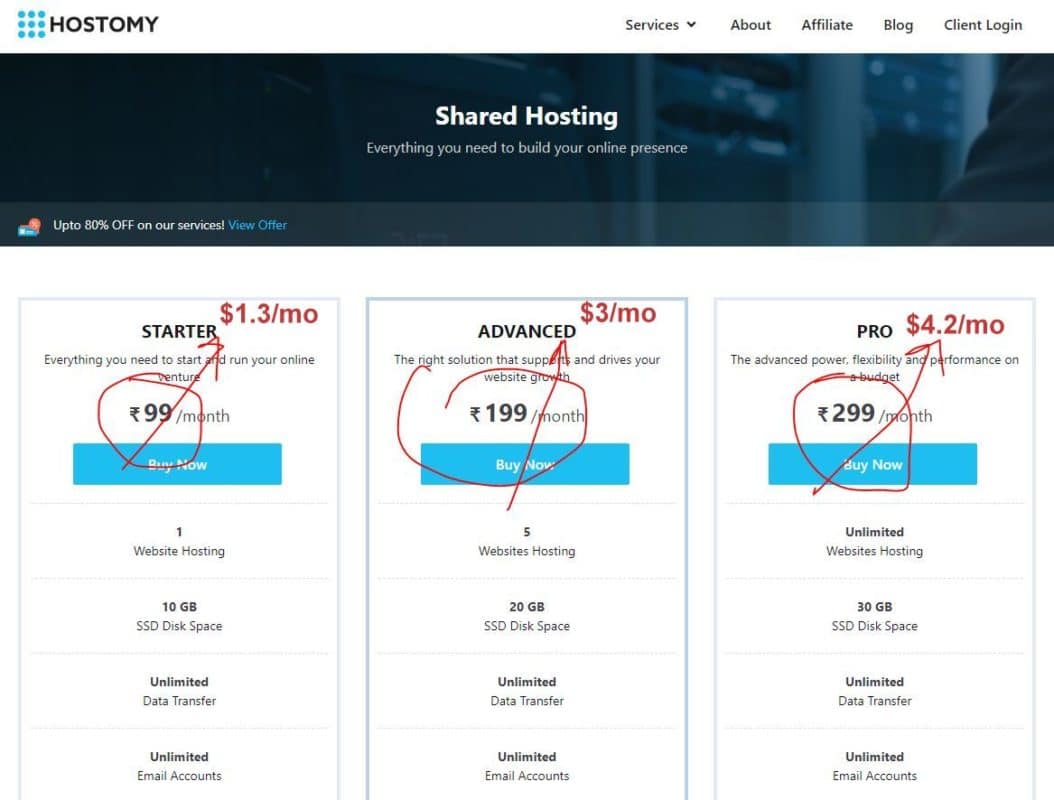
Many hosting providers provide a free SSL certificate when registering a domain and buying a hosting. Use this offer to provide access to the site via the secure https protocol. I would prefer Hostomy shared hosting plan for beginners!
Simply scroll down to your Cpanel you can see Softaculos script auto-installer. It will help you install WordPress in just two clicks.
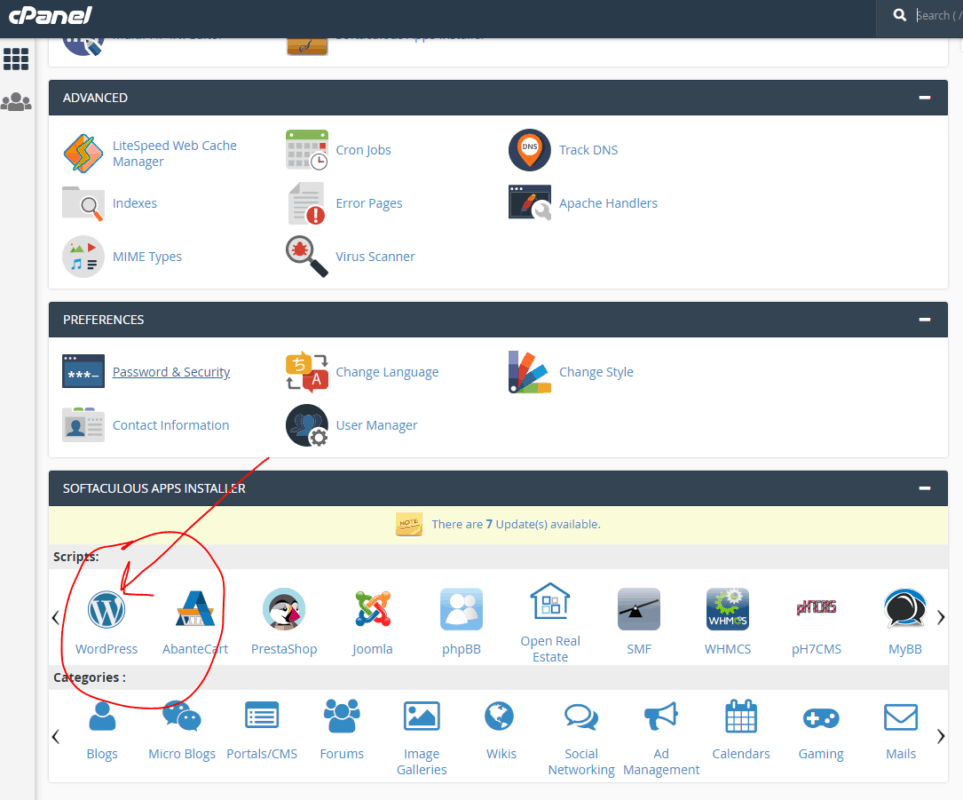
Thanks to Softaculos, you don’t have to upload the engine distribution package to the server via FTP
Before installing CMS automatically, pay attention to important details:
- Instead of the standard Admin, specify a different administrator name.
- Create a strong password to log in to the administrative console.
- Install the Loginizer plugin to protect against brute force.
- Enable auto-update of CMS, themes, and plugins.
After changing the settings, run the installation.
Important WordPress Installation Preferences
When choosing a topic, focus on your preferences and features of the project. Consider an important factor: the design template must be compatible with WooCommerce. Theoretically, the plugin should work with all themes for WordPress. But in practice, some templates work incorrectly with the eCommerce platform.
The default theme of WooCommerce Storefront , as well as its child themes, works well .
Storefront and its related themes can be found on the official WooCommerce website.
The official WordPress theme catalog has templates whose developers declare compatibility with WooCommerce. The same topics can be found through the site’s admin panel in the “Appearance – Themes” section.
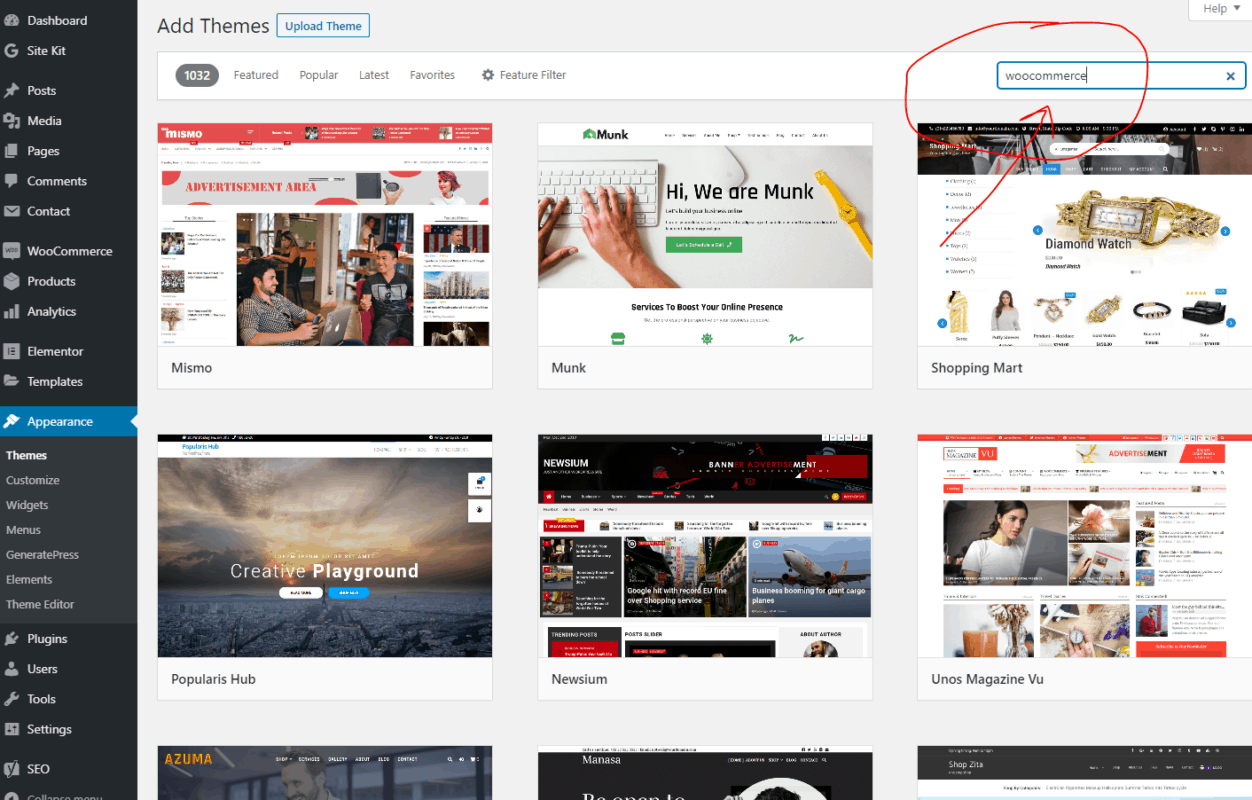
We are looking for compatible themes with WooCommerce!
Suitable design templates are also available from WordPress community-approved commercial theme developers.
How to install and configure WooCommerce
The WooCommerce plugin can be found in the official WordPress directory . It is most convenient to install it through the admin panel in the “Plugins – Add New” menu. And if you chose the default Storefront theme from the WooCommerce developers, the control panel will prompt you to install the plugin as well.
After activating any lightweight theme (We prefer GeneratePress), you are prompted to install WooCommerce.
After installing and activating the plugin, the system will prompt you to specify the basic settings. At the first stage, the setup wizard will create the basic pages: “Shop”, “Basket”, “Checkout”, “My Account”.
Create pages and customize the plugin further.
In the next step, select the country and currency. In the drop-down menu, specify the position of the currency symbol.
Check the box “Yes, I will include taxes in the order price”. In this case, visitors to the online store will see the final prices of the goods. You will return to the tax settings later.
Specify location settings!
Next, the setup wizard will prompt you to specify the units of weight and length. You have to choose between kilograms and grams, as well as between centimeters and meters. Everything is simple here: if you sell tea at retail, it is more convenient to indicate the weight in grams. Wholesalers are better off choosing kilograms. The length of any product in a roll is more convenient to indicate in meters, and the dimensions of shelves for books or flowers are easier to evaluate in centimeters.
Choose the appropriate units!
In the payment settings, specify the payment methods you will be accepting. Integrating a payment gateway is pretty much easy. Simply go to the plugins ADD NEW section and look for the right plugin for your payment gateway.
We prefer using RazorPay or Stripe as they are globally accepted.
How to add Products to the store built with the WooCommerce platform?
Adding a few products to the store is better immediately after the basic settings of the platform. This will provide visibility when working with fine-tuning and site functionality.
The products in the store running on WordPress and WooCommerce are organized in categories. You can view existing or create new categories in the “Products – Categories” menu.
Product Category Menu
To create a new category, specify a name, add a short description and a thumbnail. Indicate a label if necessary. If the category is a child, use the drop-down menu to select the parent category. In the “Display Type” menu, select the option you want.
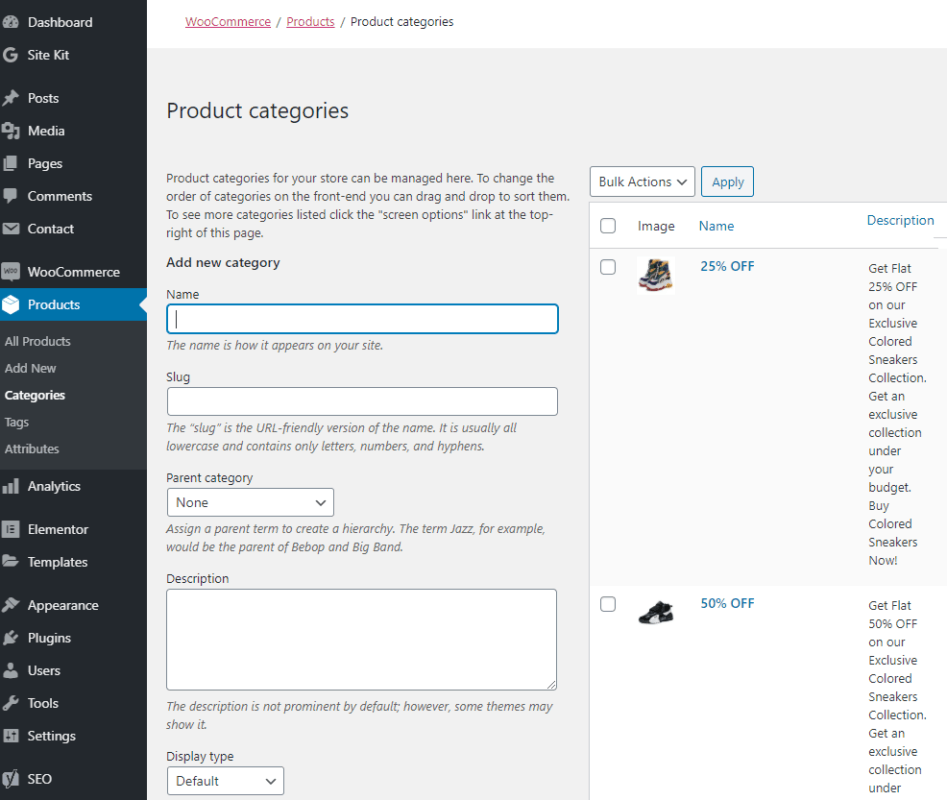
Create a new category
Please note that when installing WooCommerce, the system creates test categories. Edit them to not add new ones.
You can add a product to the menu “Products – Add New”. Select a category, specify a product name, add a description.
Choose a category, specify a name and add a description!
Select a product type, specify a standard price. If you are planning a sale, enter the appropriate data.
Specify product data
Add the necessary data on the “Inventories” tab: specify the article, if necessary, enable automatic inventory management. In this case, the number of available products will be displayed on the site. You can also enable pre-ordering.
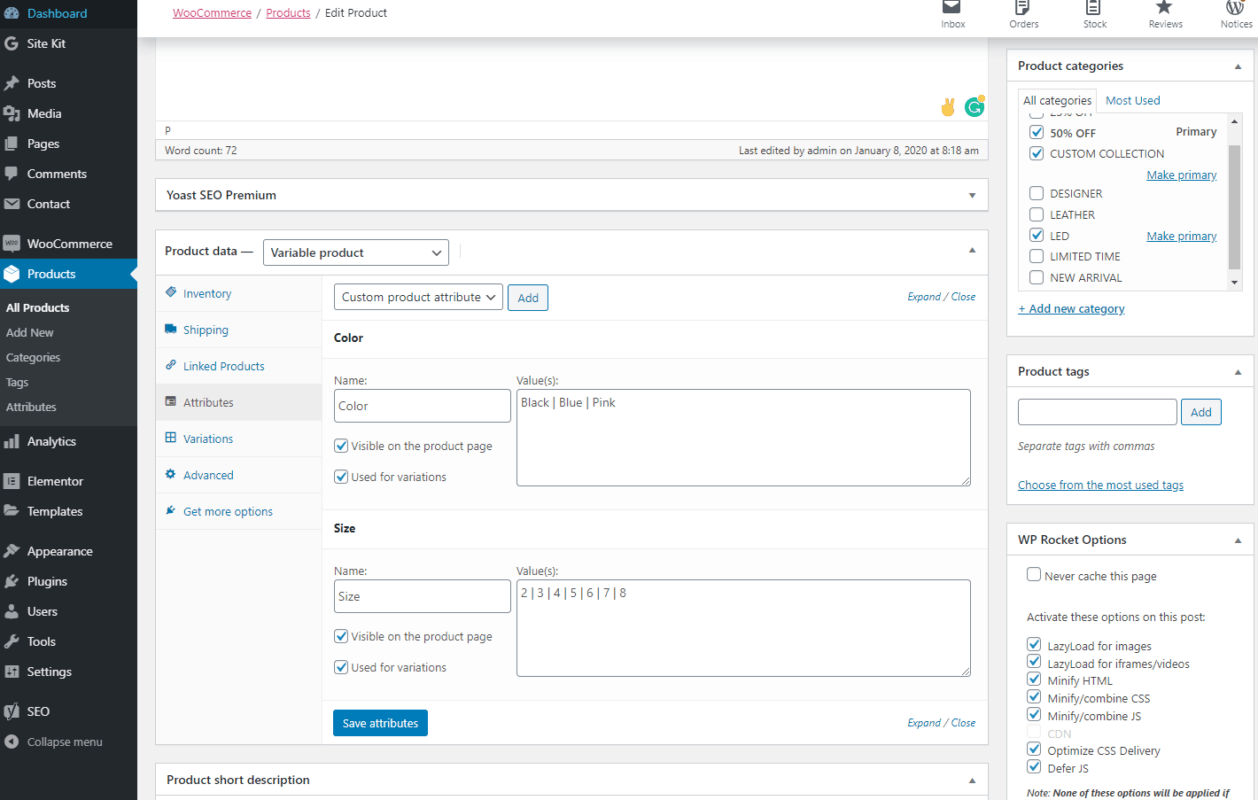
On the delivery tab, specify the weight and dimensions of the product. On the “Related” tab, you can specify products for up-selling and cross-sale. On the Attributes tab, enter the additional product information, such as colors or sizes. Provide additional information if necessary.
Specify product information
Add product thumbnail and a short description. This data will be displayed on the main page or on the category pages. If necessary, create a photo gallery of the product.
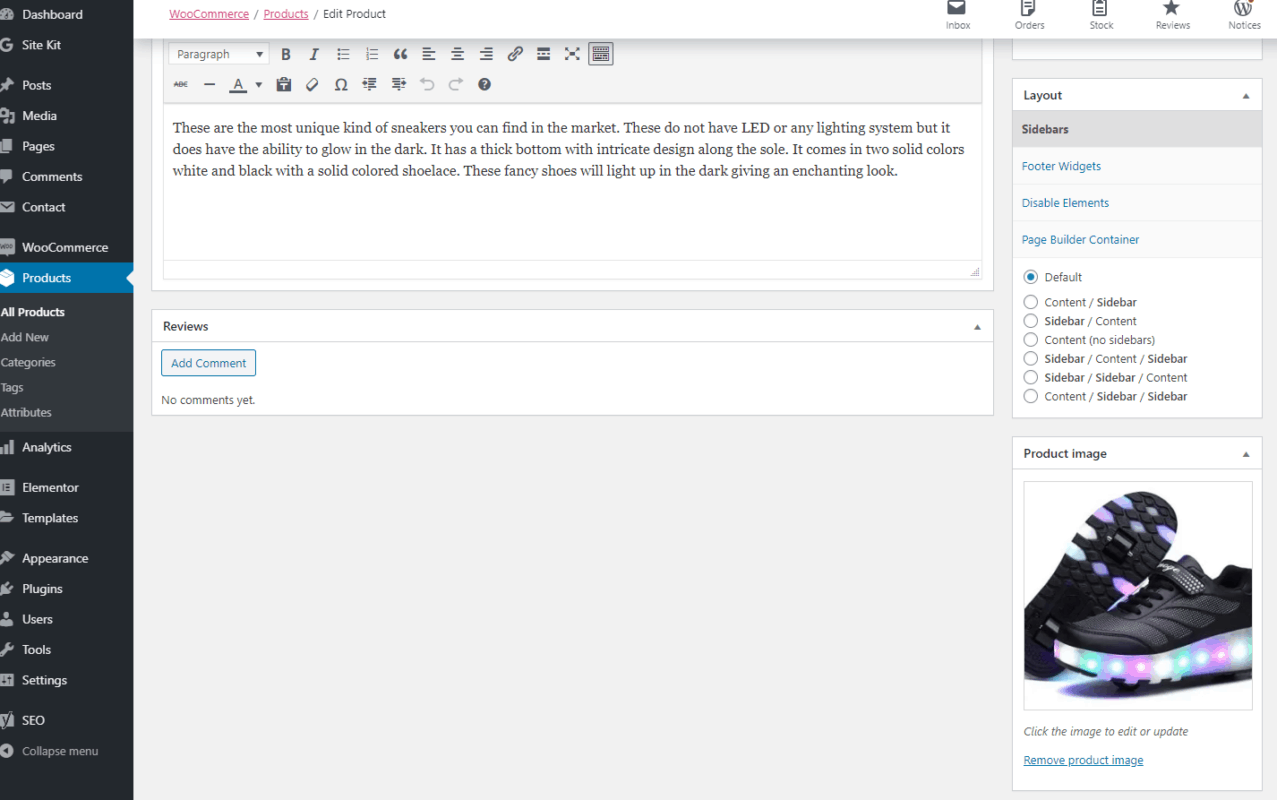
Specify a brief description and thumbnail
Publish a product. Check how the product preview is displayed on the storefront.
Product preview on the storefront
Make sure that the product page contains the correct data.
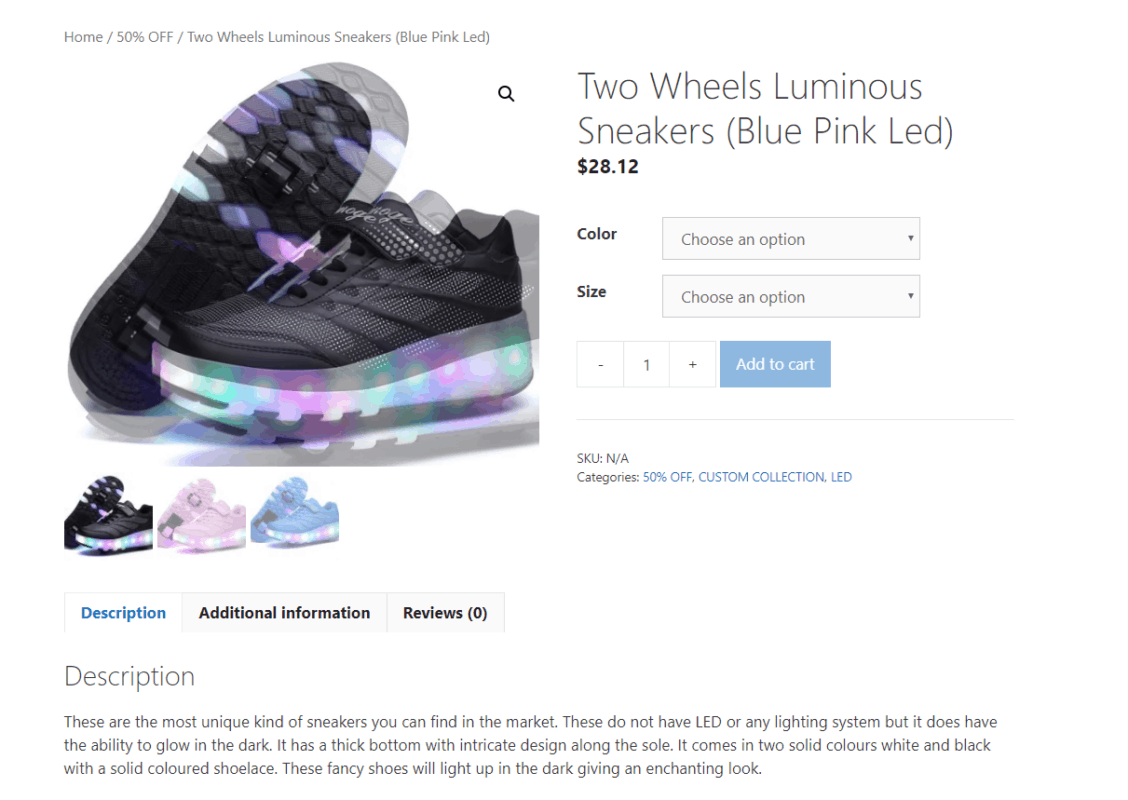
WooCommerce Store Product Card
Add a few products and proceed with the fine-tuning of the store.
How to set up the Home page and Menu
There are two options for setting the home page. If you create an online store on an existing site, the storefront can be placed on one of the internal pages. In this case, the main page will be the records page or an arbitrary static page.
By default, the store page is not the main
If the site works only as an online store, it is logical to make the storefront the main page. In the admin menu “Settings – Reading” specify that a static page will be displayed as the main one. In the drop-down menu, select the option you want.
Assign the automatically generated Sample Page to the post page. In the future, it can be edited and used as a blog.
Homepage Settings
You can create or edit the menu in the “Appearance – Menu” section. Indicate the name, in the “Show location” section, check the “Main” and “Mobile menu” options. Add the desired pages to the menu.
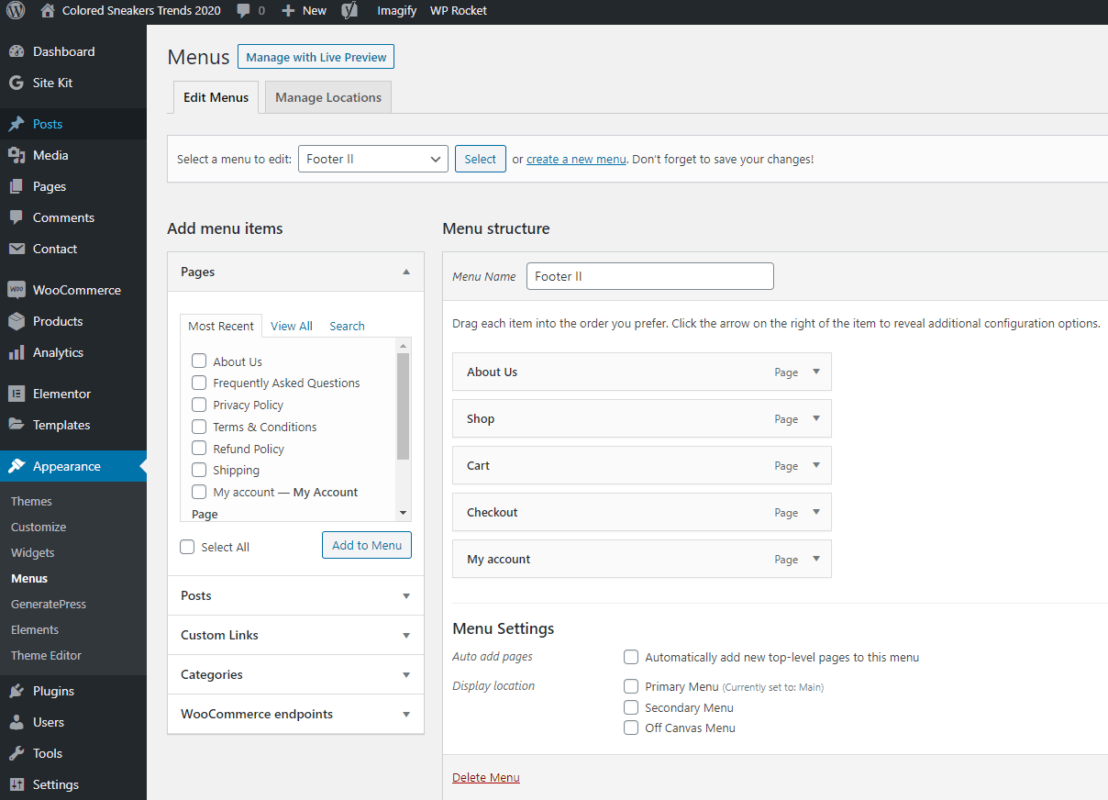
Add static pages to the menu
If necessary, you can add arbitrary links, publication categories, and WooCommerce endpoints to the menu. Endpoints or endpoints – service pages, for example, a list of orders, account details.
Add links to the main or most popular product categories in the menu. To do this, copy the category URL and specify it in the “Custom Links” section.
Add popular product categories to the main menu
Create an additional menu if necessary. To do this, go to the “Area Management” tab. Use the link “Use the new menu”.
Create an additional menu
Add pages to the additional menu. For example, these might be WooCommerce endpoints.
How to work with Advanced WooCommerce settings?
After installing WooCommerce, the setup wizard helped you specify the main parameters of the store. Now pay attention to advanced settings.
How to set up taxes in WooCommerce
Before setting up taxes, you must select a tax form. If necessary, consult with experts: an accountant or a tax inspector.
If your store operates on a simplified taxation system, you are guided by the domestic market, and LLC or IE is used as a registration form, use the following tax settings:
- Flag the option “Yes, I will indicate prices including taxes.”
- To calculate taxes, use the store address.
- Indicate the zero shipping tax rate.
- If you sell products for which there is a special or zero VAT rate, specify additional tax classes.
- Show prices in-store including taxes.
- Leave the Price Suffix field blank.
- In the “Show total tax” item, select the “As one total” option.
Save the changes and check how the price of the goods is displayed.
Tax settings for individual entrepreneurs and LLC on the simplified tax system in the store on WooCommerce.
How to configure Delivery Options
In the “WooCommerce – Settings” menu, select the “Delivery” tab. Click the “Add Delivery Area” button.
We create delivery zones
Indicate the name of the zone and select a geographic region. Add shipping methods. Pickup, Free Shipping, and Flat Rate methods are available. The latter method allows you to set a single shipping cost for the selected region.
Specify delivery methods
To edit the delivery method, click the “Change” link next to the corresponding link in the list. In the dialog box that opens, you can change the name of the method, tax status and cost of the service.
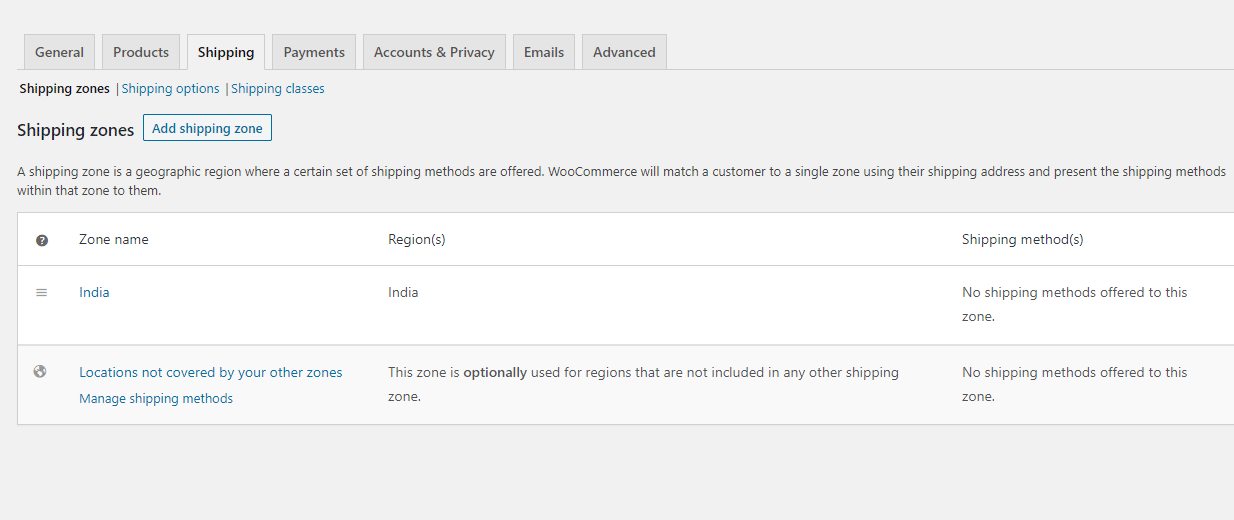
We used a free-shipping scenario in our case.
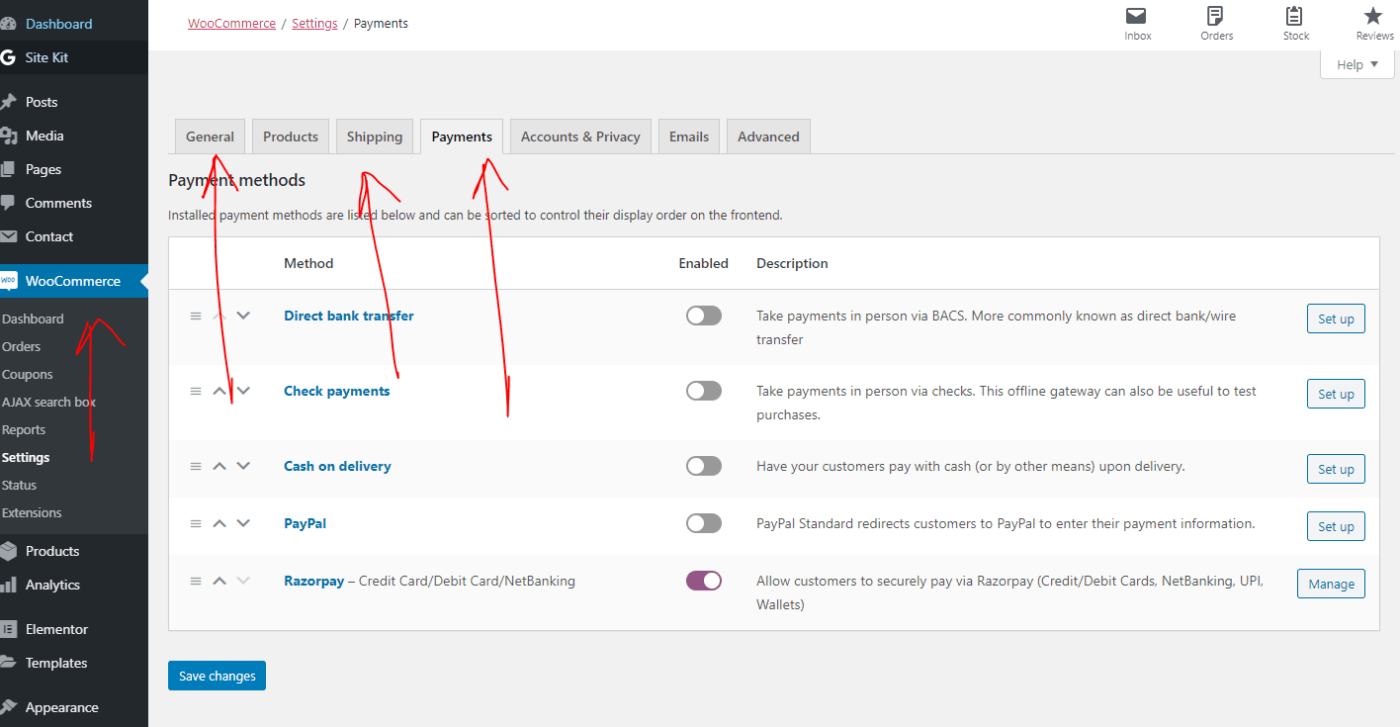
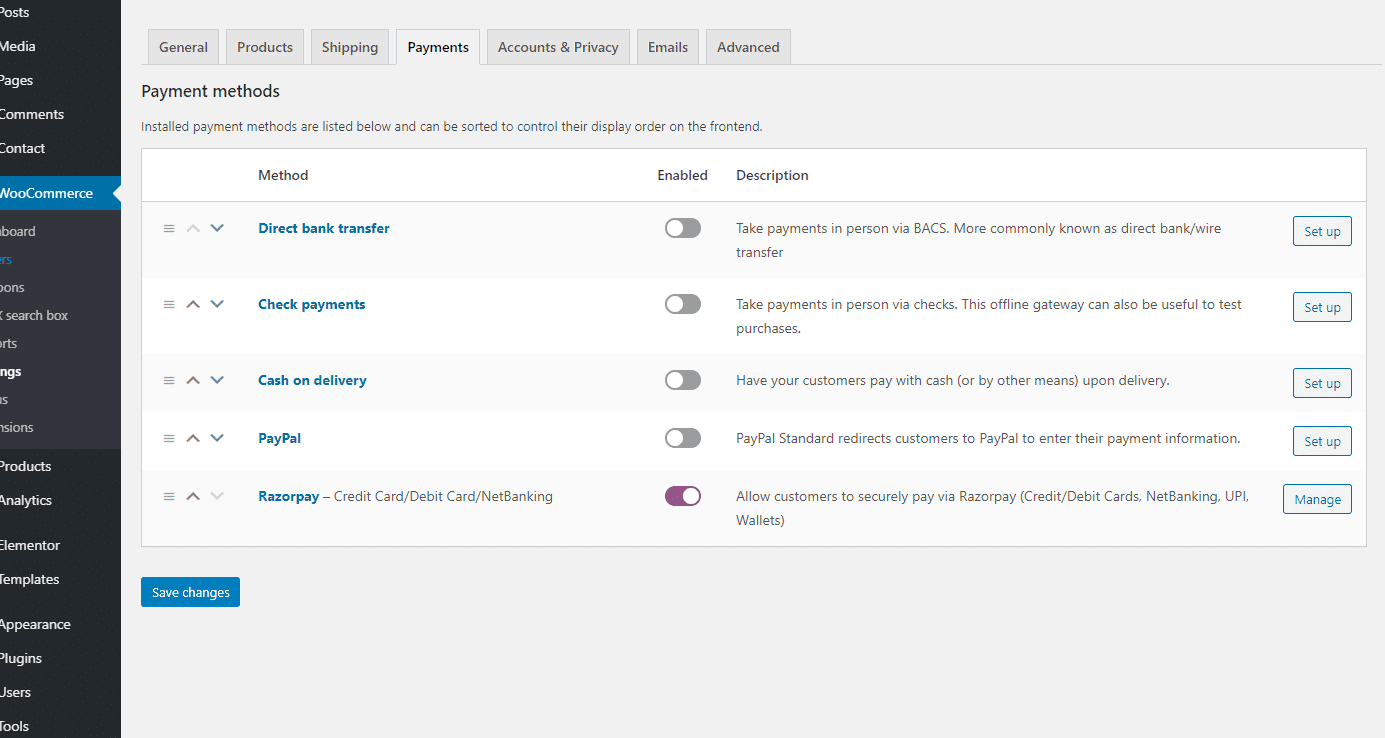
How to set up payments for a store on WooCommerce
Now connect to the site a universal payment system that supports several popular methods of receiving payments from customers.
For example, connect the RazorPay service to the site. To do this, register in the system, provide the payment provider with the necessary data and install the free plug-in for WordPress from the “Razorpay”. After installing and activating the plugin, configure payment methods in the WooCommerce – Settings menu.
To set up a single gateway, click on the appropriate link in the list of payment gateways.
Choose a currency, indicate the identifier, the method of generating the electronic digital signature and the key of the electronic digital signature of the store. Specify allowed payment systems. Change other settings as necessary.
If necessary, change the settings for accounts and email addresses. On the Email tab, specify the electronic mailboxes to which notifications of executed and paid orders will come. On the API tab, leave the REST API enabled. After specifying advanced settings, pay attention to the technical characteristics and functionality of the store.
How to Improve Technical Specifications and Expand the Functionality of the store on WooCommerce
At this stage, connect an additional SEO module, create an ideal URL structure, set up accelerated mobile pages and eCommerce-specific micro-layout.
How to Optimize a store on WooCommerce
WordPress and WooCommerce sites are SEO-optimized by default. If you are a beginner, then you have already installed the basic All in One SEO Pack plugin. It allows you to subtly optimize the resource to the requirements of search engines.
For advanced users, we would prefer using the Yoast SEO Premium plugin.
Install and activate an add-on for the base plugin: Yoast SEO Pack module. This tool allows you to control the metadata of product pages and adds additional functionalities to the product editing page.
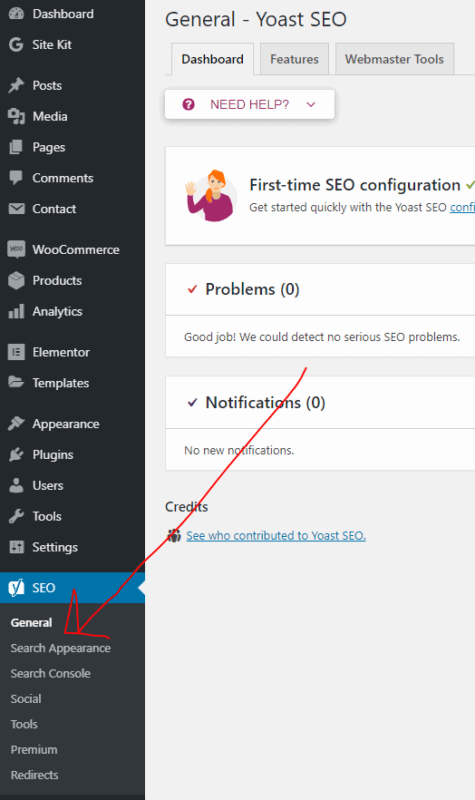
Yoast SEO Pack on the product edit page
Note that the Keywords field is best optimized for beginners. Though search engines do not take into account their content when ranking, so do not waste time until you know the basic on-page SEO techniques. Or follow the guidelines.
Pay attention to the URL. At the stage of basic site configuration, you turned on the CNC. But when using WooCommerce by default, product links contain the prefix product. This is unnecessary information that makes the URL too long.
Product URLs include product prefix
The problem can be solved using the paid Perfect SEO URL plugin. This add-on makes WooCommerce store product links perfectly aligned. Examples can be seen on the demo site of the plugin.
An ideal URL includes a product category and product name without prefixes product or shop.
If you don’t want to spend $ 119 on the Perfect SEO URL plugin, download and activate the Permalink Manager Lite module. In the console, select the Tools – Permalink Manager menu. Click the Permastructures tab. In the line “Products” specify the desired structure of the URL. To display only the category name and product name in the link, use the% product_cat% construct.
Configure the Structure of Permanent Product URLs
Add a new product to the site. Check how the link is displayed.
Perfect SEO Product URL: there are a product name and category, no extra prefixes!
Please note that changes to the URL structure do not automatically apply to previously published products. Links to them will have to be edited manually. To do this, on the plugin settings page, select the URI Editor tab. In the products section, make the necessary changes.
Manually edit existing product URLs!
Check the display of manually edited links.
How to Configure Micro-Layout and Open Graph protocol
If you connected the All in One SEO Pack plugin recommended in the beginner’s guide, connecting the Open Graph protocol does not take much time. In the settings of the SEO-combine, turn on the Social Meta module. This is enough to display an attractive snippet when publishing product links on social networks.
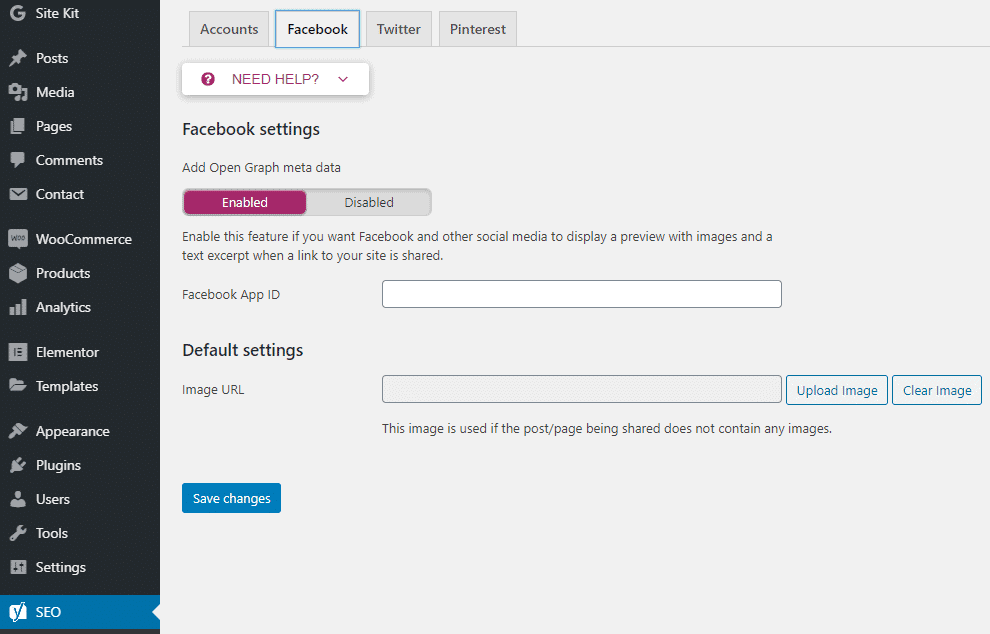
On the module page, change the Open Graph settings for Facebook. Select the “Site” data type, enable Facebook Meta for the “Products” post type.
Customize the display of the snippet on Facebook.
Specify the Product data type for product pages.
Select a data type for product pages.
The proposed settings provide a visually appealing snippet for links to product pages.
If necessary, change the display settings of Twitter Cards.
The default store template on WooCommerce supports the Product Schema.org micro-layout type for product pages. However, the micro-marking implemented in the topic does not pass validation.
Micro Distribution does not pass Validation!
Due to errors in micro-markup, search engines may not display advanced snippets on search results pages. This reduces click through rates and reduces store search traffic.
You can fix this with the paid Schema WooCommerce Plugin by the Schema App plugin. This add-in corrects errors and adds the missing data to the markup, which is necessary for generating an advanced snippet in SERP. The cost of the plugin for one site is 47 dollars.
Correct micro-marking can also be added using free tools, for example, All In One Schema.org Rich Snippets. After installing and activating the plugin, you must enable markup support on product pages.
Turn on markup on product pages!
After that, an additional field will appear on the product editing page in which you can specify data for advanced snippets.
The markup created using All In One Schema.org Rich Snippets is validated. The problem is that the old markup with errors remains in the page code.
The validator skips the new markup but swears at the old
In addition, All In One Schema.org Rich Snippets does not implement markup via JSON-LD. Therefore, information is visible not only to search for robots but also to people. A block with semantic data actually duplicates the information on the page.
How to Create an AMP for a Store on WooCommerce
According to Google, the conversion of mobile users is directly dependent on the download speed and ease of use of eCommerce sites on small screens. Therefore, the largest search engine in the world recommends that owners of online stores use AMP.
To implement accelerated mobile pages, install and activate the basic AMP plugin and two add-ons: AMP for WP and AMP WooCommerce. Accelerated versions of static pages, posts and products will appear on the site.
Pay attention to AMP settings. They are available in the corresponding menu of the administrative panel.
Pay attention to a number of important options in the context of setting up AMP for an online store. Turn on the Call Now button. That will help the owners of the store to immediately contact the sales department. You can specify the phone number and select the appearance of the button in the Design section of the AMP settings.
Connect the paid Call to Action feature. This add-on for the AMP for the WP plugin adds call-to-action conversion forms to accelerated pages. The cost of the add-on is $ 30.
In the Notifications section, if necessary, enable notifications. They are often used to inform visitors about the use of cookies on the site.
How to Increase the Site Speed (using a Paid Plugin)
We prefer using WP-Rocket to help optimize the speed of your eCommerce store. Alternatively, you can also use the LiteSpeed Cache plugin which is free.
You need to optimize Page Caching, Cache Preloading, Static Files Compression, Images on request and several other factors that majorly affect your store’s speed.
Use the Advanced Features of WooCommerce
Your store is almost ready to go. Pay attention to the additional features of the platform to make the site attractive to users.
Use the customizer to customize the look of the store. In the menu “Appearance – Customize” you can change the title and description of the site, set the background image in the header, change the colors of links, headers and text. You can also choose the appearance of the buttons, the position of the sidebar, customize menus and widgets, add custom CSS.

In the “Title” section, you can upload an image to the header and change the colors of links and titles.
In the menu item “Appearance” you can expand the functionality of your theme. You can choose free and paid add-ons. For example, you can connect for free the attached “Buy” button and an additional basket icon.
Also from the menu “Appearance” you can select and install a child theme. Paid and free themes and plugins for WooCommerce can be found on the project website in the Extensions Store and Theme Store sections.
Pay attention to some useful solutions:
- The Facebook for WooCommerce plugin will help you manage your ad campaigns on a popular social network. It’s also easy to add a store on the brand’s Facebook page using an add-on.
- WooCommerce Multilingual plugin will help make the site multilingual.
- If the selected theme does not have a built-in slider, the WooCommerce Product Slider plugin will help.
- If the theme doesn’t support zooming in on hover, try YITH WooCommerce Zoom Magnifier.
- The YITH WooCommerce Wishlist plugin adds the Wish List feature to the site.
- Using Super Socializer, you can add the ability to register through accounts on social networks.
- The paid WooCommerce 360º Image plugin allows you to show customers 3D photo products.
- Using WooCommerce Recover Abandoned Cart, you can return to the site visitors who added goods to the basket but did not place an order. The plugin is paid.
- WooCommerce Quick Export Plugin, a paid solution, helps you to instantly export customer and transaction data to a file. This is necessary if you are transferring a resource to a new hosting.
For other WooCommerce performance tools, check out the official WordPress plugin directory.
You can manage orders and track statistics in the “Orders” and “Reports” sections of the WooCommerce menu. In the “Coupons” section, you can create and publish promotional offers to increase sales.
WordPress and WooCommerce are AWESOME!
Thanks to the most popular CMS and the most popular eCommerce platform, you can quickly create a full online store. This does not require knowledge in web development. In the first stages, your expenses will be minimal, as the platform, templates and basic plugins are available for free. You can read through our guide of 91+ Free WordPress Business Plugins.
Setting up a store and managing it is very simple. You can independently increase the SEO-friendliness of the site and further adapt it to mobile traffic. Thanks to the developed WordPress infrastructure, you have almost unlimited possibilities for customizing and expanding the functionality of the store on WooCommerce.
The combination of WordPress and WooCommerce will help you focus on expanding the range of products and increasing sales. And if you have questions about the site settings, write in the comments.