It’s still a dream for all of the bloggers to get AdSense approved. As the field’s competition increases day by day, all niches are saturated in the blogging world. Even the good looking websites are being rejected for the AdSense approval as they unknowingly fall under Google AdSense policy violation.
If it were me, I would stay away from the listed niches below-
- News sites
- Reviews on mobile phones, hosting, gadgets
- Viral videos
- Cooking
- Templated sites like- Quotes, Songs, Job Portals, Subtitles, Apps, and Software downloads
- Insurance
- Technical blogs
- Video and Image hosting sites
These are the most saturated niches where you cannot imagine getting on the top quickly.
If you have already decided to go with one of these, you should take my advice and change the topic. You can only think about excelling in one of these if you have at least 50 good, unique and quality blog posts. Remember to start with a micro-niche and do not mess up many topics under one place.

What is the micro-niche?
For instance, if you want to create a website on pets, you need to narrow it down even more. Like you can go with a cat blog or dog blog. You can narrow it even more to a particular dog breed.
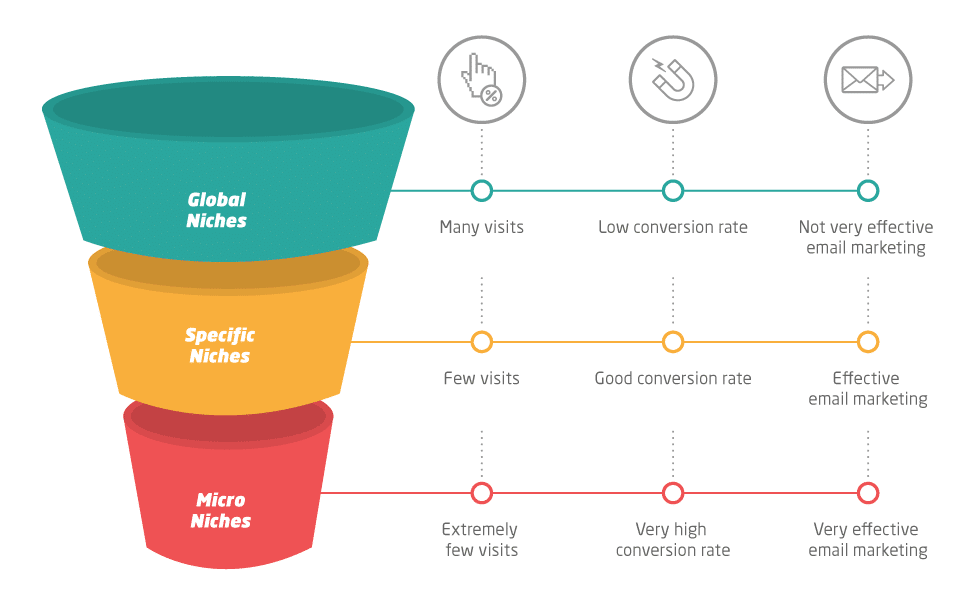
Micro niches are great because the competition is something every beginner can deal with. Comparatively, there will be much higher competition for dog blogs rather than a particular breed like a pomeranian.
Google AdSense is always looking for unique and fresh content from the publishers. And if you are among the people who have been a victim of Google Adsense Policy Violation, you need to know many things!
If you need ideas to get started, please check out 50+ micro niche ideas from income school. It can be beneficial for beginners or for people who are out of ideas. This Excel sheet has everything you need to do, including which niche is best for you, how much traffic will get, it is good for affiliate, it is seasonal or not. It has everything that a new blogger must know before starting.
Getting back on track, here are few important must-know facts you should read before applying for AdSense. You must also read it even if you are in a situation where AdSense approval got rejected due to some reason you are not aware of. There’s always a good chance of you doing Google AdSense policy violation unknowingly.
No one can find the exact error with his blog after receiving the Google Adsense policy violation email. It’s always a mystery to people, and they spend hours thinking about what they could have done possibly wrong. The issues are often addressed as-.
Valuable inventory:
While these are not the only reason for Google Adsense Policy Violation, these are prevalent ones that beginners suffer from. To learn how you can fix those errors in no time, click on the links above as I have written a solution for each of them in different blogs to make it easy for you.
Now let’s consider the Google Adsense Policy Violation error and why it occurs. There can be several issues that result in this error. I have compiled nine easy steps using which you can solve this error without a hassle. Do follow all the steps carefully before you apply again for AdSense.

Fix Google Adsense Policy Violation Error: Step by Step Guide
STEP 1: QUALITY CONTENT
The first thing that every blogger must know is always put out unique and quality content. You are making a big mistake if you are copying it from another source or using a spinner. You must not take the content from someone else; neither should you purchase it from someone.
The best thing you can do to stay safe is to write meaningful and useful content yourself to help the user.
Maintain the keyword density in your blog to be 1%. However, don’t just randomly place your keyword; else, it might look like spam, or the keyword may not grammatically go with the sentence. Try to write the sentences that make the keyword meaningful wherever those are meant to be placed.
Here is a guide that can help- What is Keyword Cannibalization and How to Avoid it?
However, Tags don’t play a significant role in blogging; still, if you are using it, use it carefully. Choose appropriate heading tags, alt tags, and meta tags. Make sure you don’t make a grammatical or spelling error in those as then it will be completely useless.
It would help if you were careful about not starting your career as a blogger with a competitive niche. Getting started with hard to rank niches like health, insurance, or cooking will not do you any good. At times AdSense often rejects the application by Google AdSense Policy Violation because there is no possibility of your ranking.
Here is a detailed guide I shared previously on How To Retrieve FREE Content From Archive.org and Post It On Your Website: 10 Easy Steps On Automation.
Also, have enough content on your website already before you apply for AdSense. After all, AdSense is a kind of platform that runs on the text-based advertisement. You need to give Google good quality readable texts! If Google finds out you have something that people would like to see, it will have no reason to reject the application. To get started, but at least 20-25 blog posts having a minimum of 500 words per blog.
BONUS- You can hire cheap writers from Fiverr. I would recommend this GIG, which I have been using to get quality content $10 for 500 words.

STEP 2: SIMPLE DESIGN WITH SIDEBAR WIDGETS AND EASY NAVIGATION
Google also considers if users can browse through the website easily. This is because their ads will be placed anywhere on the side and then made sure it is easily accessible to the users reading the blog. Many bloggers use flashy and unwanted widgets that have no excellent structure. If you got anything like that on your website, you need to delete it asap!

Have two basic menus on your website called primary and secondary menus. Keep the primary menu for your categories and content. The rest of the pages like privacy policy, contact us, or about us can be piled up in the secondary menu. You can place your secondary menu in the footer area or at the very top.

To get started, have at least 4 to 5 categories with 4 to 5 blog posts. Make sure you don’t use more than 5 or 6 tags. Else, it can start to look like a spammy blog that wants attention even if it’s not serving the purpose. Just put the meaningful tags relevant to the topic to attract the right users rather than just anyone and everyone.
Try to get a premium theme for your website or blog as it has exclusive features. Free themes often come with encrypted scripts that can be damaging to your website.
You can use this guide to optimize images on your website- 10 WordPress Image Optimization Plugins: Best Free & Paid Included
Make the site load speed of your web pages faster. As a beginner, make it fast enough to load under 5 seconds. Even that is not a very good page load speed, but that’s difficult for most people to achieve. You should know that 60% of the users on the Internet service using their mobile and not the PC. So another thing to remember is to make your website mobile-friendly.

Here is a detailed guide that will help you with- WordPress Website Optimization for Google PageSpeed Insights
Have a clean sidebar widget. Putting too many things like a search bar, blog stats, categories, or pages will crowd your website for no good reason. Choose a theme where you can keep this widget on the top or main menu and sidebar. Here is a list of the 10 fastest WordPress themes.

STEP 3: CREATE MANDATORY PAGES
To get approval from AdSense, you need to create some mandatory pages. Without them, you will fall under Google Adsense Policy Violation every time you apply.
About us: Here, you can create a summary of what your website is about in just five or four lines. You can write why you started your website and how it can help the users.
Contact us: Here, you will need to create a contact form where people can connect you. Mention your correct email ID and other contact details if you have anyone reach out to you in case of a query.
Disclaimer: For this one, you must Google a disclaimer page. You will get multiple samples of disclaimers in Google; all you need to do is copy it and then change the URL.
Privacy Policy: Just like the disclaimer, you need to Google this one as well. Many websites on the internet can create a privacy policy page for you.
Cookie Policy: This one was not mandatory a few years ago, but now Google AdSense is strict about it as it is necessary to protect user’s privacy.
Sitemap HTML (Optional): While this one is not mandatory, it can still help the bots crawl over your website. Put a sitemap HTML on the bottom or top of your website to get indexed in a better way.
These are the top pages that you must have before even putting up the blogs. You must have it whether you are applying for Google AdSense or any other add publisher like Media.net.
STEP 4: IMAGES FREE OF COPYRIGHT
Putting up rich media in your blog is another way to attract users. However, make sure all the images are copyright-free, so they don’t create trouble in the future. Downloading random pictures from Google and using it in your blog is the worst thing you can do to cause Google AdSense policy violations. However, if you are in a situation where you need to use the pictures that you downloaded from Google, you should strictly edit them before posting.
However, going for royalty-free images would be the best and safest option. Uncountable websites on the Internet provide royalty-free photos that people can use to be free from copyright issues in their YouTube video blocks or Instagram.
If you can recall a copyrighted image on your website, you should remove it right now and replace it with a copyright-free image to stay away from Google AdSense policy violation.
I have mentioned some free sites and tools that you can use for images. See this guide, point. 6.
STEP 5: USE HIGH-QUALITY DOMAIN
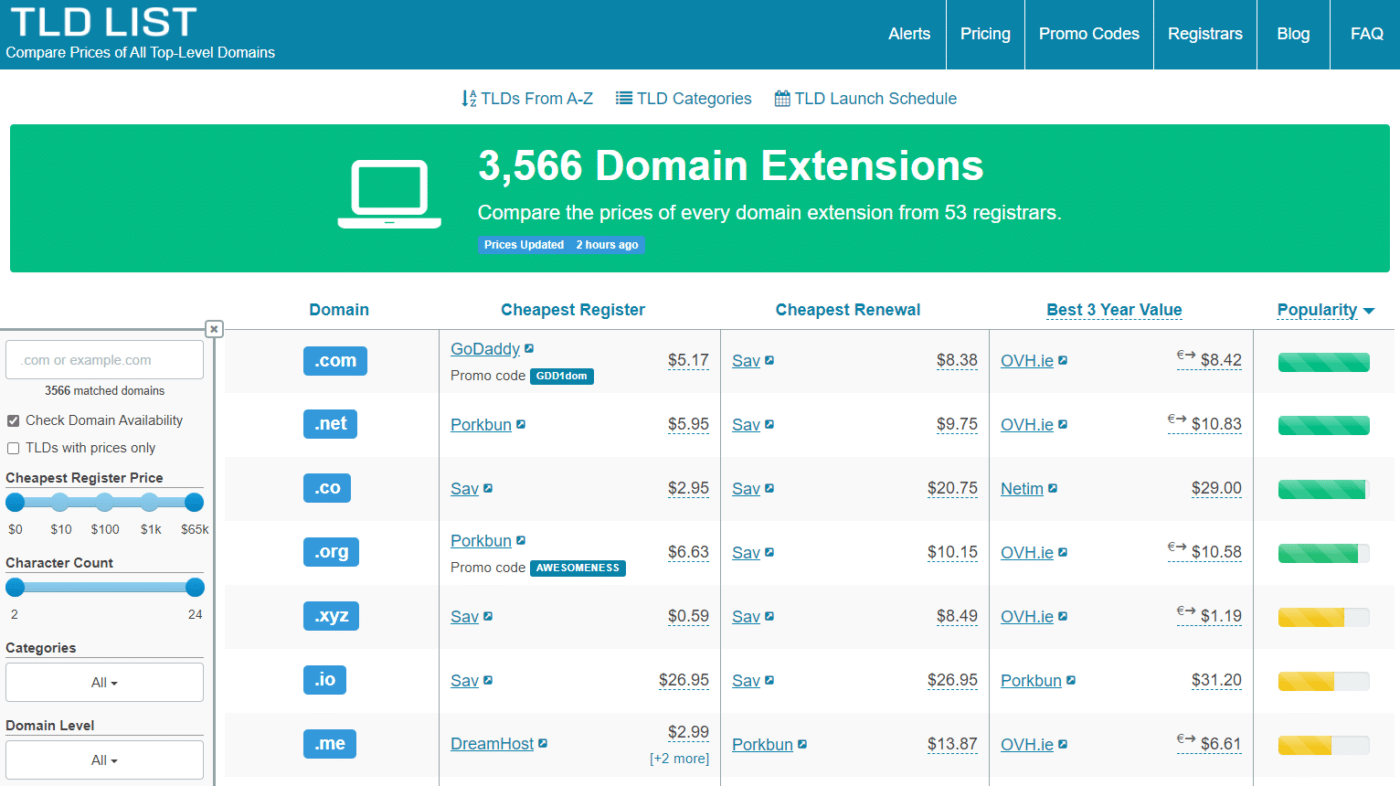
We all know what a premium publisher Google AdSense is. If you go for a domain extension that sounds anything similar to .xyz, .my, .ga, .ta, you will not get approved. And even if you do, the chances for you to rank over high-quality domains like .com, .org, .net would be significantly less.
Make sure you get a top-level domain before you apply for Google AdSense, and till then, don’t. You can quickly get quality do men like mentioned above just under $10.
You can compare domain prices here, and get the best deal for yourself.
STEP 6: REMOVE UNWANTED AFFILIATE LINKS OR AD CODE
If you are using a third party advertisement code, you should remove it before applying for AdSense. You must clear your website of all the affiliate links from even high profile websites like Amazon. Get rid of unwanted embedded YouTube links, GIFs, or any other flashy thing that doesn’t contribute to the content.
However, it’s not compulsory still; it can be a reason for Google AdSense policy violation in rare cases. So it’s best to apply with a clean website, making it super easy for visitors to read the blocks.
STEP 7: SUBMIT THE SITEMAP
Another critical step for getting AdSense approval is to submit the sitemap. Also, you must submit the sitemap of your website in the Google search console.
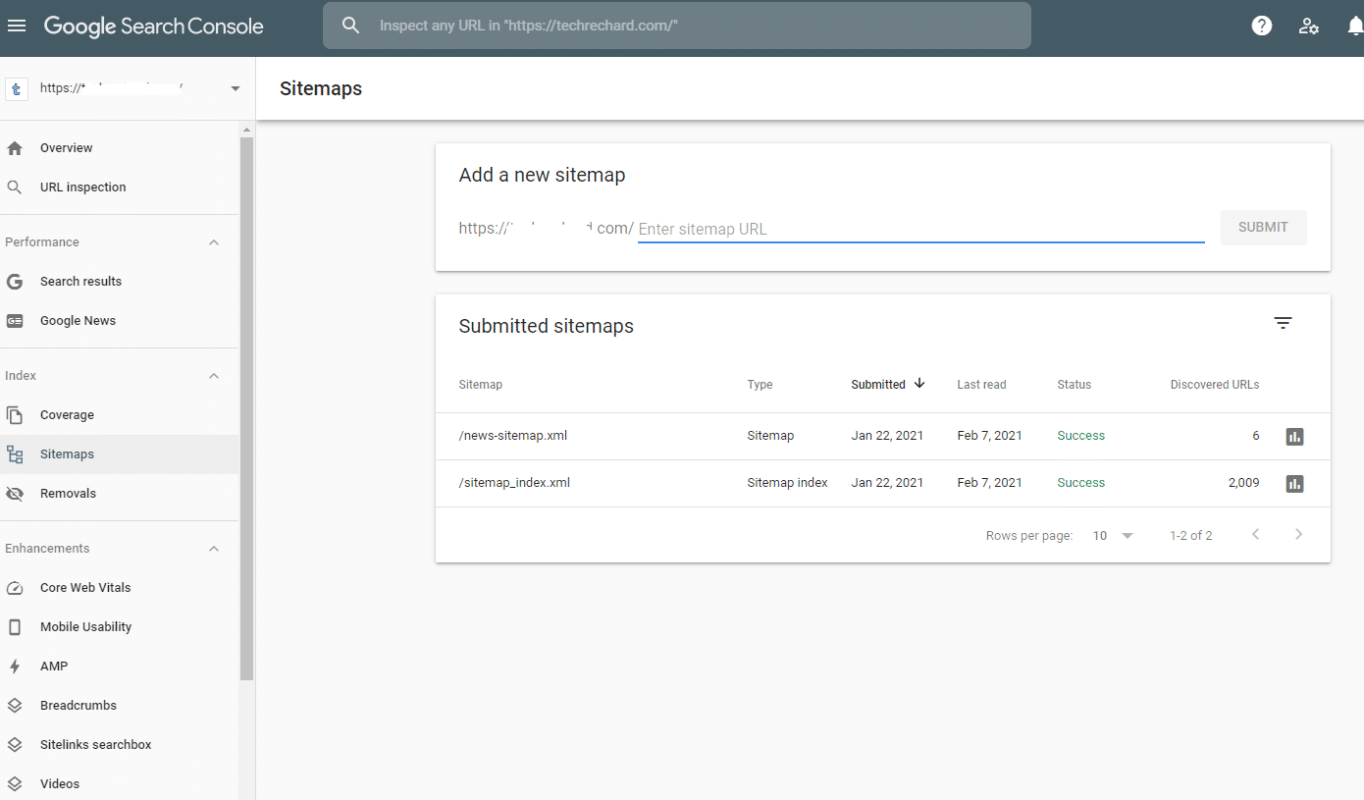
If you don’t know how to do it manually, you can go for free plugins like rank math, Yoast SEO, or even Google XML. The appearance of the sitemap code is different for all the plugins. If you use Google XML, the resulting sitemap will look like- https://yourblog.com/sitemap.xml. And if you make it through Yoast SEO, it will be- https://yourblog.com/sitemap_index.xml.
Your blog post is not getting instantly indexed after submitting the sitemap in the search console. You will need to wait for five days, at least, for all your blogs to index. After that is done, you should apply for AdSense again.
Here is another guide in case you need- My Website Got Deindexed From Bing: Here’s How you can fix it?
If you are using wordpress, you can use Rank Math or Site Kit plugin to configure your webmasters.

STEP 8: TRAFFIC SOURCE
The good news here is traffic is not mandatory to get AdSense approval. However, most people are not aware of it and try to gain traffic or even buy them before applying for AdSense. People create Pinterest traffic or bring it from telegram or WhatsApp group. However, it is not necessary for AdSense. It’s never a reason for Google AdSense policy violation.
My suggestion would be that you don’t care for traffic when it comes to AdSense approval. If you are about to purchase traffic, give it a few months before you reapply for AdSense.
Organic traffic is the best traffic as the referral traffic doesn’t generate real income due to low CPM.

STEP 9: SOCIAL MEDIA
Social media is critical to creating the authenticity of your website. Here is a list of social media handles that you can get no matter what blog you are making-
- Quora
- Twitter profile
- Facebook page
- Medium
- Instagram profile
You can put your website URL in all these social media handles once they are created. This generates web 2.0 links.
You can also share your blog post on any of these platforms before you apply for AdSense.

Conclusion: Google AdSense Policy Violation
That’s all you must know to have a complete explanation on how you can fix the Google AdSense policy violations. Now your part is to follow each step carefully. In case you still have a query or are doubtful about your situation, you can contact us in the comment section, or you can refer to my other blogs that address AdSense-related issues. You can also go through our in-depth Google AdSense Guide.
Just try to understand what Google needs- They are working with advertisers who are paying them huge amount of money. If their ads are being displayed on poorly designed websites, it will hurt their reputation.
If you still have any queries, please share your problem below, or you can also check out our amazing services at Fiverr related to Adsense approval, etc.


